Looping Music in Unity
Unity's default audio capabilities have never been a particular strong point. Some much needed functionality has been added over its lifespan, like audio mixers, sends, and insert effects, but it's still extremely limited compared to the feature sets found in widely used audio middleware and even other game engines.
In this post, I'm going to talk about 3 different potential approaches of gradually increasing complexity for looping music with native Unity audio. Hopefully, there will be something useful here for a variety of experience levels.
First we'll cover use Unity's default loop functionality. Second, we'll use a bit of audio editing and AudioClip PlayScheduled() to create a seamless loop. Lastly, we'll calculate a loop point given the beats per minute (BPM), beats per measure (Time Signature), and the total number of measures in the track and create a simple custom looping system, again using PlayScheduled().
Before starting, it should be noted the mp3 format is ill-suited for this application for technical reasons beyond the scope of this post and should be avoided. Ogg and Wav are good options that handle seamless looping well in Unity.
1. Default Loop
This is the simplest option, requiring no scripting at all, but it's also the most limited. For music that with no reverb or tail to speak of or music that doesn't need to restart exactly on measure, this can be serviceable. A quick fade at the end of the last bar can work for less ideal music tracks, but it will result in an obvious and unnatural loop point.
Create a new object in your scene, or use one that already exists. Whatever is appropriate.
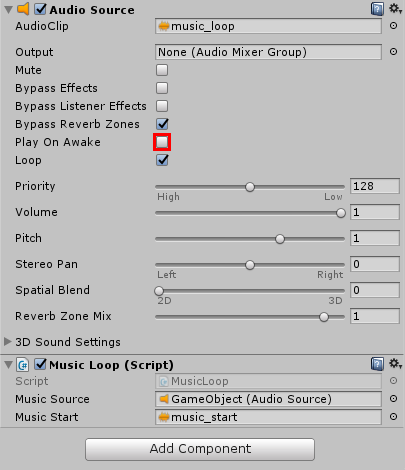
Add an AudioSource component to it and set the AudioClip to your music file, either from the menu to the right of the field or by dragging and dropping it from the project browser.

Make sure that "Play On Awake" and "Loop" are enabled. Your music will play when you start the scene and loop at the end of the audio file.
2. Manual Tail/Release Overlap
This method requires some work outside of Unity with an audio editor or Digital Audio Workstation (DAW). Here we'll still use Unity's default looping functionality, after playing and introductory variation of the looped track.
Before doing anything in Unity you need two separate versions of the music track in question, one with the tail cut at the exact end time of the last bar/measure, and another with that tail transposed to the beginning of the track, so that it overlaps with the start.

Ensure that the start and end of these tracks are at a zero crossing, to avoid any discontinuities (audible pops) during playback. This can be accomplished with extremely short fades at the start and end points. This second track will transition seamlessly from the introductory track and loop seamlessly as well.
Add an AudioSource to an object as in the previous section and set the second edit of the track (with the tail overlapped with the start) as the default AudioClip. "Play on Start" should NOT be enabled.
This is where a bit of scripting is required. Create a C# script and add it to the same game object as your AudioSource.

Open it in your IDE of choice. This will only require a few lines of code. First, declare two public variables: an AudioSource and an AudioClip
public AudioSource musicSource;
public AudioClip musicStart;
Save this and switch back to the Unity editor. There will be two new fields for the C# Script component in the Inspector: "Music Source" and "Music Start."
Click and drag the AudioSource you added to your game object earlier into the "Music Source" field on your script. Do the same with "Music Start," using the intro edit of the clip (without a tail at the start or end).

This is where the code that makes noise comes in.
void Start () {
	musicSource.PlayOneShot(musicStart);
	musicSource.PlayScheduled(AudioSettings.dspTime + musicStart.length);
}
When the scene Starts, the first clip will play once and the second clip will be scheduled to play as soon as the first has ended. This start time is determined simply by adding the length in seconds of the first clip to dspTime (the current time of the audio system in seconds, based on the actual number of samples the audio system processes).
From that point, the track will loop normally with Unity's default loop functionality.
3. Calculating the Loop Point and Looping Manually
The last approach requires more scripting work, and some extra information about the music itself, but does not require any specific editing of the audio file. We'll be creating a simple custom looping solution using two AudioSources and AudioSource.PlayScheduled() that calculates the end of the last bar or measure based on some data entered in the Inspector and uses that to determine the loop interval.
Add two AudioSources to your game object and set the default AudioClip for both to the music track you're going to loop. This will allow each repeat to overlap with the tail of the previous one as it plays out.
Add a new script to your game object and open it on your IDE. First, we need some public variables that we can set in the inspector: an array of AudioSources and three integer values which correlate to simple properties of the music composition itself.
public AudioSource[] musicSources;
public int musicBPM, timeSignature, barsLength;
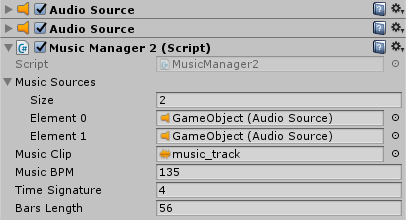
In the inspector, set the Size of the Music Sources array to 2 and drag the two AudioSources you've created to the Element 0 and Element 1 fields.
Then enter a few music properties. Music BPM is the tempo of the music track in Beats Per Minute (BPM). Time Signature is the number of beats per bar/measure. and Bars Length is the number of bars/measures in the track. You need to know these values for this calculation to work.

Next, we need some private variables for some values we will be calculating in the script itself.
private float loopPointMinutes, loopPointSeconds;
private double time;
private int nextSource;
The loopPoint values will be used to store the loop interval once it has been calculated. Time will be the value of dspTime at the start of the scene and be incremented by loopPointSeconds for each PlayScheduled() time. And nextSource will be used to keep track of which AudioSource needs to be be scheduled next.
Now, in the Start() method we need the script to calculate the loop interval, play the first AudioSource, and initialize the time and nextSource values.
void Start () {
	loopPointMinutes = (barsLength * timeSignature) / musicBPM;

	loopPointSeconds = loopPointMinutes * 60;

	time = AudioSettings.dspTime;

	musicSources[0].Play();
	nextSource = 1;
}
The custom loop functionality itself is defined in the Update() method, which is called every frame.
void Update () {
	if (!musicSources[nextSource].isPlaying) {
		time = time + loopPointSeconds;

		musicSources[nextSource].PlayScheduled(time);

		nextSource = 1 - nextSource; //Switch to other AudioSource
	}
}
First, we check if the nextSource is still playing. If it is NOT:
- Increment the time by the loop interval (loopPointSeconds).
- Schedule the nextSource AudioSource to play at that time.
- Toggle the value of nextSource (from 1 to 0 or from 0 to 1), so the script will check and schedule the other audio source.
And that's it. The music track should begin playing at the start of the scene and continue to repeat at the loop point until the object is destroyed.